Digitization plug-in
4N6site.com
How to use it
Once you copied the plug-in to your host's plug-in folder you will find it in the filter menu (Photoshop), under "Forensic Filters".
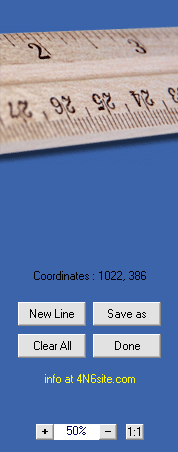
After opening your RGB image and choosing "Digitization" from the filter menu you will see your image in the preview. You can drag the image with the left mousebutton down on the image, and you can adjust the magnification with the buttons at the bottom of the button panel.
You can collect the coordinates of points by right-clicking them in the preview. You can clear the collection or start a new line with coordinates by clicking the corresponding buttons. You can save the collected data by clicking the "Save as" button and choosing a file to save to. The extension of the textfile with the data will either be ".txt" or ".csv" (which can be read by Excel etc.). Of course the precision of the positions you determined depends on the quality of your scanner.
This plug-in has been optimized for use with large files and has been tested with files larger than 1 GB (uncompressed). Maximum sizes depend on your hardware configuration. The measurements can be read into Excel or any other (e.g. home-made) program to analyze the data obtained.